If you’re wondering how to install roof vent? properly and safely, this complete attic ventilation guide will walk you through every step — from roof vent placement to flashing installation and preventing roof leaks. Whether you’re considering roof vent installation DIY or planning a professional roof exhaust vent installation, understanding the process is essential.
Learning how to install roof vent? the right way protects your attic, improves airflow, reduces moisture buildup, and extends the life of your shingles. Poor ventilation can lead to mold, warped decking, higher energy bills, and premature roof damage. This guide explains the tools, positioning, and techniques required — and when it’s smarter to call professionals.
Why Proper Attic Ventilation Matters
A balanced attic ventilation system allows hot air and moisture to escape while pulling in fresh air from soffits. Without proper airflow, heat becomes trapped during summer and condensation forms during winter. Over time, this damages insulation, weakens roof decking, and shortens shingle lifespan.
A correct roof exhaust vent installation helps:
- Prevent moisture accumulation
- Reduce mold and mildew growth
- Improve HVAC efficiency
- Prevent ice dams in colder climates
- Extend overall roof life
Before starting roof vent installation DIY, it’s important to understand how ventilation works as a system, not just a single vent.
How Many Roof Vents Do I Need?
One of the most common questions homeowners ask is: how many roof vents do I need?
The general rule is 1 square foot of ventilation for every 150 square feet of attic floor space. However, local codes and roofing structure may vary.
Balanced systems require:
- Intake vents (soffit vents)
- Exhaust vents (ridge vents, turtle vents, or box vents)
Improper calculations can lead to negative pressure and moisture trapping. If unsure, professional assessment is recommended.
Best Location for Roof Vents and Roof Vent Placement
Choosing the best location for roof vents is critical for airflow efficiency and leak prevention.
Roof vent placement guidelines:
- Install vents near the ridge line
- Keep at least 18 inches below the ridge peak
- Avoid valleys where water runoff is concentrated
- Ensure spacing is evenly distributed
Installing vents too low can reduce efficiency and increase the risk of water intrusion.
Roofing Tools for Vent Installation
Before cutting a hole in a roof, gather the proper roofing tools for vent installation:
- Tape measure
- Chalk line
- Roofing nailer or hammer
- Utility knife
- Pry bar (for shingle removal for vent)
- Reciprocating saw or jigsaw
- Roofing cement
- Flashing kit
- Safety harness and roof protection equipment
Safety always comes first. Roof work involves fall risks and structural hazards.
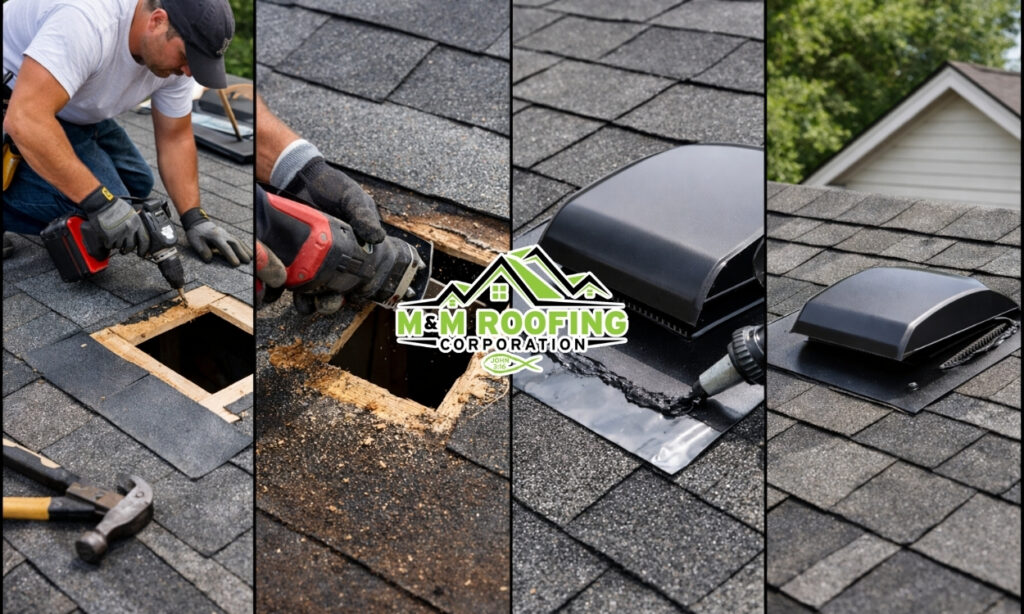
Step 1: Marking and Cutting a Hole in a Roof
The most critical step in how to install a roof vent is precision when cutting a hole in a roof.
Steps:
- Locate the center between rafters from inside the attic.
- Drill a pilot hole upward to mark the spot.
- On the roof surface, measure the vent template outline.
- Remove shingles around the area (shingle removal for vent).
- Use a saw to cut along marked lines.
Always cut carefully to avoid damaging rafters or decking structure.
Step 2: Installing a Turtle Vent or Box Vent
Installing a turtle vent (also known as a box vent) is one of the most common roof vent installation DIY methods.
After cutting the opening:
- Slide the upper portion of the vent under existing shingles.
- Position the lower flange over shingles.
- Nail securely using roofing nails.
The vent should sit flat and flush with the roof deck.
Step 3: Flashing Installation and Roofing Cement Application
Proper flashing installation is what separates a durable job from a leak-prone one.
Steps:
- Install metal flashing around the vent flange.
- Apply roofing cement beneath the flange edges.
- Seal nail heads with roofing cement application.
- Replace surrounding shingles carefully.
This step is critical for preventing roof leaks. Poor sealing leads to long-term water damage.
Preventing Roof Leaks During Roof Vent Installation
Most roof vent failures occur because of improper sealing or poor vent placement.
To prevent leaks:
- Avoid overusing roofing cement (can crack over time).
- Ensure shingles overlap correctly.
- Never install in low drainage areas.
- Confirm flashing edges are sealed tightly.
Water intrusion often happens months after poor installation, so attention to detail is essential.
Replacing an Old Roof Vent
If you’re replacing an old roof vent, the process is similar but includes removal:
- Carefully lift surrounding shingles.
- Remove nails securing the old vent.
- Clean debris and inspect decking for rot.
- Install new vent following flashing installation steps.
Rotten decking should always be replaced before installing a new vent.
Roof Exhaust Vent Installation vs Ridge Vent Systems
A roof exhaust vent installation using box or turtle vents works well for many homes, but ridge vents provide continuous airflow along the peak.
Ridge vents are ideal for:
- Large attic spaces
- Uniform ventilation needs
- New roof installation projects
However, installation complexity increases and may require professional roofing contractors.
When Roof Vent Installation DIY Is Not Recommended
While roof vent installation DIY may seem manageable, certain situations require experts:
- Steep pitch roofs
- Multi-level roofing systems
- Tile or metal roofing materials
- Structural damage concerns
- Inadequate attic intake ventilation
Incorrect installation can void roofing warranties and cause structural damage.
If you want guaranteed performance, code compliance, and long-term durability, it’s always safer to consult professionals. M&M Roofing Corp provides complete residential solutions, from ventilation systems to full roof replacements. Explore their expert residential roof services here: Residential Roof Installation Services by M&M Roofing Corp.
Final Thoughts: How to Install Roof Vent? Done Right
Understanding how to install roof vent? means more than cutting a hole and placing a vent. It involves airflow calculation, precise roof vent placement, proper flashing installation, and thorough sealing.
A properly ventilated attic improves comfort, lowers energy bills, and protects your roof investment for decades.
If you’re unsure about vent quantity, best location for roof vents, or preventing roof leaks, professional guidance ensures safety and durability.
Investing in expert roof exhaust vent installation can save thousands in long-term repair costs.